well. Unfortunately, I abuse my printer
by not using it often enough.
Also, I don't change the ink often enough
and let the ink run dry. This is serious
neglect that can lead to my print heads
clogging.
Right now, I'm working on this very problem.
Here are some steps that give me a pattern
that tells me how my printer is behaving.
The pattern reveals all 6 inks separately:
- Turn the printer off
- Put fresh paper in the paper
feed - Hold down the middle button, the
form feed button on my R200 - Continue to hold the form feed button
down while you briefly hit the power button
to power up - Keep holding the form feed button down
until a pattern prints on your paper. - Hold the form feed button down continuously
(don't let go!) until the printer spits out
the paper - Look at the pattern that the printer printed
on your clean sheet of paper
Here's a link to something similar. The link
is for an Epson printer model that has 7 inks.
My printer only has 6 ink colors.
However the principle is much the same.
Apparently what I just described above
is called a nozzle check pattern:
Checking the Print Head Nozzles
While this does not fix the printer clogging
problem, it does reveal which nozzles are
giving you a problem.
In the past, I've found that if I reseat the
ink cartridge that is going me a problem that
this will fix the problem.
I know that sounds weird. How can taking the
ink cartridge out of the printer and then putting
it back in fix anything? Well, it does. Sometimes
it does.
Here's something else that can help. Epson has
their manuals online. Here's the manual for
the R200. A nozzle clearing procedure
is described in the manual:
Epson Stylus Photo R200 Printer Basics
Here's an inkjet refill forum that gives you
a test pattern for a 6 ink color printer:
Inkjet Refill Forum
Here's the actual test pattern which has
black, cyan, light cyan, magenta, light
magenta, and yellow:
Six Color Printer Test Pattern
As of this writing, I've solved the problem
for some of my inks but not all of them. Cyan
is still having problems.
What will I try next? I understand that you
can buy clear inks to unclog a clogged printhead.
I may try that next. I assume that a clear ink
is a solvent of some kind. That's my best understanding.
Sounds like a clear ink may be a good idea. Here's
an ink retailer that sells clear ink:
InkSupply.com
Here's where InkSupply.com discusses this issue:
http://www.inksupply.com/epsonclean.cfm
Here's a discussion of purging:
Purging Desktop Printers
Here's a printer test pattern that I like better than
the one shown above:
Purging Test Pattern
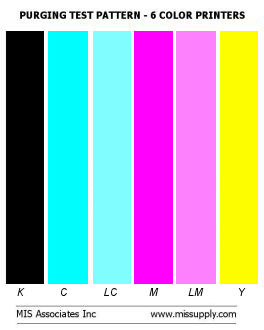
6 color printers
I've printed the same above test pattern over and over
again. So far, it has not cleared my printer. I wonder.
Do I need nozzle cleaning fluid? Here is a 2 oz bottle:
2 Oounce Nozzle Cleaning Fluid
Here's the same thing in a pint bottle:
Pint of Nozzle Cleaning Fluid
While I'm at it, I should probably get new plugs for
my refillable cartridges:
BLACK PLUGS - 2200 EMPTY
CARTS - PACKAGE OF SEVEN PLUGS
Since the R200 has sponges in the ink cartridges, the
above plugs are the right ones. I've contacted technical
support at inksupply.com and they've confirmed this
for me.
I think I'll call InkSuppy.com on Monday and try to
figure out what to do. I'm a repeat customer. Love
their printer inks!
I have a theory as to why I'm in trouble with my printer
inks and why I'm seeing colors that are two light and
have lots of banding.
I think it is because my sponges are full of dry ink.
My refillable cartridges are very dry looking and are
not absorbing ink properly.
How do I know this? For one thing, the sponges are very
light colored compared to the ink. That is to say, the
sponge half of the cartridge is a much lighter than the
color side of the cartridge.
I just refilled my black ink cartridge. My black inch
cartridge accepted 4 more ounces of ink than my color
ink cartridges have been accepting. This tells me that
the ink is very dry in the sponges of my color ink
cartridges.
This is a phenonema that you often see in nature. When
the ground is very dry, the ground will not accept a
sudden downpour of water. Instead, the water runs off
causing flash flooding etc.
I think I'm getting the same sort of effect with my
sponges being too dry. They are not accepting more ink
because these sponges are full of dry ink.
Perhaps a solution to this problem is to come back
in a week and see if my sponges are now raady to accept
more ink.
Update: December 12, 2011
I'm writing exactly one month later
after having purchased new ink from
InkSupply.com and refliing my cartridges
with new ink.
My printer is working perfectly now! and
has been doing so for almost a whole month.
It seems that me letting the ink cartridges
dry out was the whole problem. I was not
using my printer as often as I might and
I was letting the ink cartridges run out of
ink to the point where they were bone dry.
Of the two problem -- using the printer seldom
and allowing the ink cartridges to run completely
out of ink --- I'd say the bigger problem is the
bone dry problem. Letting my ink cartridges run
out and sit there for quite some time bone dry
is a bad bad idea.
Having done this, I've learned a valuable lesson.
I don't think I'll ever let my cartridges run
completely out of ink again.
With my car, I never let the tank get below one
quarter full. I always go to the gas station
when I've got about a quarter tank of gas left
in the tank.
I think I'll use the same system with my ink
cartridges. As soon as they get to one quarter
full, I'll refill them.
Fortunately, Epson makes this easy. Each time
you print a document, the printer shows you just
how full the ink cartridges are. They even give
you a little indicator to indicate 1/4 full,
1/2 full, and 3/4 full. I love my Epson printer!
From this experience I've learned 2 lessons:
- Don't let your ink cartridges completely empty
of ink - If they do empty of ink, don't worry about it.
Just refill them with ink and let the ink sit there
day after day turning the ink solids to liquid ink.
In my experience, it takes about 1 week for the
printer to fully recover using this method.
The big lesson is patience. Be patient and the problem
solves itself.
It takes fresh ink and patience to solve the problem of
clogged print heads.
Update: February 21, 2012
Got out of bed this morning and tried the print the
above 3 images. I wanted to see if I could get
full magenta coverage on all 3 images.
I used the following steps to do so:
- Load a fresh piece of paper in the
printer - Click on the image
- After you click on the image,
the image should appear in full
resolution in your browser - Right click on the full
resolution image - Choose open image in new
tab - type control-p to print the
image - Make sure the radio button
that gives you the option of
color or black and
white is set to color - In the bottom left corner of
the screen, look for the words,
Print using system dialog - Click on the words Print
using system dialog - When the printer dialog comes
up, choose preferences - Choose the best photo
option in the dialog. The best
photo is the top quality radio
button of 5 radio buttons - Click ok to actually print
I was able to print one and two
thirds images before the ink ran
out This tells me that I'm going
to have to try something new.
Should I just buy a new print cartridge
or should I try again? I'm not sure.
Ed Abbott